Mergeasy API
Predictable, resource-oriented REST endpoints for document automation.
The Mergeasy API is organized around REST. Our API is designed to have predictable, resource-oriented URLs and uses HTTP response codes to indicate any API errors. Keep reading below for more information on each specific service.
We are the first SaaS with the capability to first process documents (only .docx or .pdf format) and integrate with services via API. That said, you can simply upload your documents in our dashboard and get a custom curl request generated for your document exclusively.
We will touch on each detail below — from uploading the document, fetching the exclusive request for your document, and how to send that request to our API to deliver documents via Email, attached to Podio app items, or sent for digital signing via DocuSign and MergeSign.
https://mergeasy.com over HTTPS.
API Keys
Mergeasy authenticates your API requests using your account's API keys. If you do not include your key when making an API request, or use one that is incorrect or outdated, Mergeasy returns an error with a 401 HTTP response code.
You can find all of your API keys in your dashboard under Integrations.
Authentication
Requests made to the API are protected with Bearer Token Authorization. In order to properly authenticate with the API you must use your API key as the username while leaving the password blank. Requests not properly authenticated will return a 401 error code.
You can find your account's API keys on your integrations page after logging in.
- You may only interact with your own authorization token.
- You must use encryption (i.e., HTTPS). All API requests must be made over HTTPS or they will fail.
Authorization header
Authorization: Bearer dGVzdEB0ZXN0LnRlc3Q6dGVzdHRlc3Q=
Step 1 · Prepare Document for Upload
Before uploading, mark up your .docx or .pdf template so Mergeasy knows where to merge your data.
For Docx — Merge Variables
- Replace all blanks in your docx file with
{$variable}. - Make sure the variable starts with
{$and ends with}. - Include DocuSign Anchor Tags if you want to use DocuSign delivery for this template.
- Once you have replaced all blanks, visit the Documents page under your account.
- You can download the sample document used in this documentation here.
Sample screenshot of a document with {$variable} merge tags.
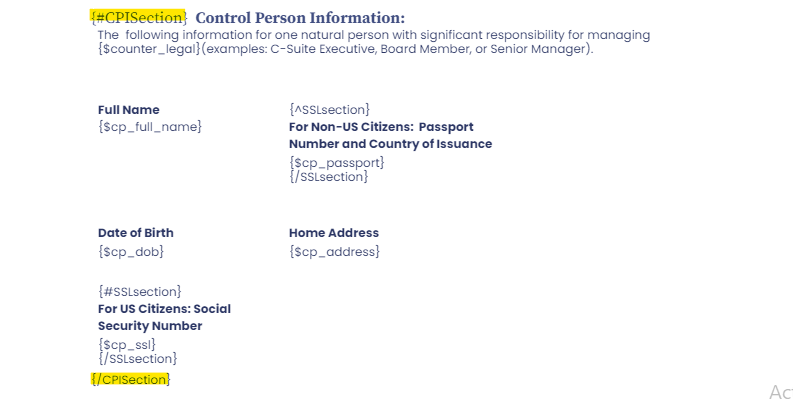
Conditional Tags
Conditional tags are used to show or hide some text in the document based on certain conditions.
- Wrap the particular section or text for which you want to apply conditions with
{#variable}. - Make sure the conditional tag variable starts with
{#and ends with}. This is called the opening tag. - Now add a closing tag by adding
{/variable}at the end of the section or text. - Make sure the variable name is the same in both the opening and closing tags.
- To use this tag, pass true or false in the request.
curl -H "Authorization: Bearer dGVzdEB0ZXN0LnRlc3Q6dGVzdHRlc3Q=" https://mergeasy.com/merge_file \
  -d CPISection="true"
Sample screenshot of a document using conditional tags.
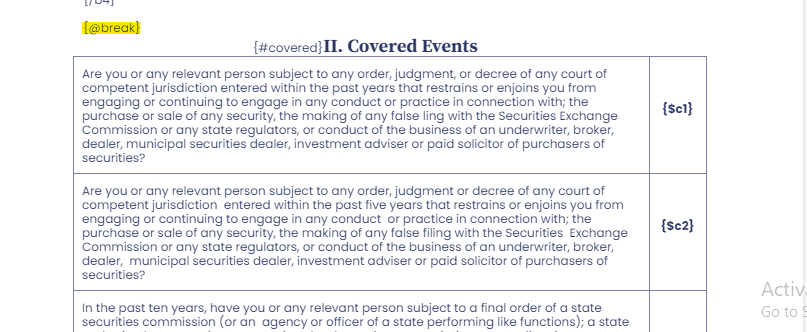
Conditional Page Break Tag
A conditional page break tag is used to add a page break in the document based on certain conditions.
- To add a conditional page break, add the tag
{@variable}. - Make sure the conditional tag variable starts with
{@and ends with}. - To use the conditional page break, pass the tag value as shown below.
curl -H "Authorization: Bearer dGVzdEB0ZXN0LnRlc3Q6dGVzdHRlc3Q=" https://mergeasy.com/merge_file \
  -d variable="<w:p><w:br w:type=\"page\" /></w:p>"
Sample screenshot of a document using a conditional page break tag.
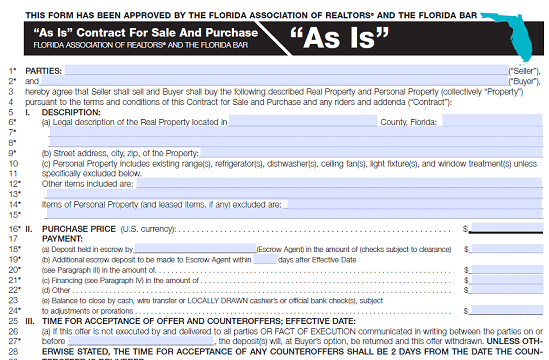
For PDF — Fillable Forms
- Make your PDF fillable using a PDF editor like Sejda, Nitro Pro or Adobe Acrobat.
- Include DocuSign Anchor Tags if you want to use DocuSign delivery for this template.
- Once you have included all form fields (fillable) and DocuSign anchors, visit the Documents page under your account.
Sample screenshot of a fillable PDF document.
Step 2 · Upload Document
Visit the Documents page under your account and upload the document. After the system has processed the document, a new row for the template will appear in the list below the upload widget.
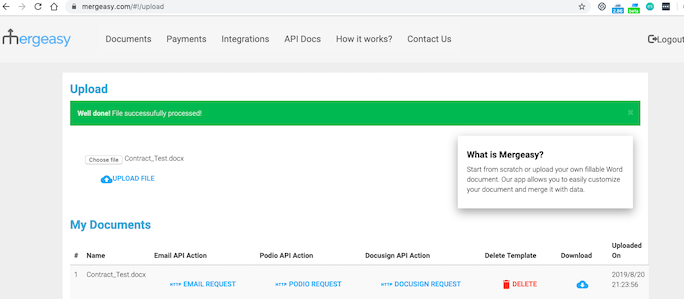
After processing, your template appears in the list with action buttons (Email/Podio/DocuSign request).
Render Image in Docx
Step 1 — Add the image tag in your docx
- Add this tag in the document where you want to render the image:
{%variable}. - Make sure the variable starts with
{%and ends with}.
Step 2 — Upload the document
Visit the Documents page and upload the document. After processing, the template row will show in the list below the upload widget.
Step 3 — Generate the document
Below is the set of parameters required to generate and deliver a document containing rendered images. Add automations@mergeasy.com as a user to your Podio workspace which contains the app items where you want to attach the merged document.
| Parameter | Type | Description | |
|---|---|---|---|
delivery_method | string | required | Defines the delivery method, e.g. podio. |
doc_id | integer | required | Unique template id (from the request button on your document page). |
doc_name | string | required | Document name. Append the file extension .docx or .pdf. |
podio_item_id | integer | required | Podio item id. |
update_podio_field | JSON object | optional | {"field_external_id":"value"} — field to update after the merged document is attached. |
imageTags[0][tag] | string | required | The image variable name used in the document. |
imageTags[0][width] | number | required | Rendered image width. |
imageTags[0][height] | number | required | Rendered image height. |
imageTags[0][url] | string | required | Public URL of the image to render. |
imageTags[1][tag], imageTags[1][width], imageTags[1][height], imageTags[1][url], … and so on.
Step 3 · Email Delivery
On your Documents page, click the EMAIL REQUEST button for a specific document to receive the ready-made curl request in a popup. Below is an example POST request to send a merged document to any email address.
| Parameter | Type | Description | |
|---|---|---|---|
delivery_method | string | required | Defines the delivery method as email. |
doc_id | integer | required | Unique template id (from the EMAIL REQUEST button). |
doc_name | string | required | Document name. Append .docx or .pdf. |
recipient_email | string | required | Comma-separated email addresses to receive the merged document as an attachment. |
email_subject | string | required | The email subject line. |
email_body | string | required | The email body. Plain text or HTML are both supported. |
In addition, pass each of your document's merge variables ({$variable}) as form fields.
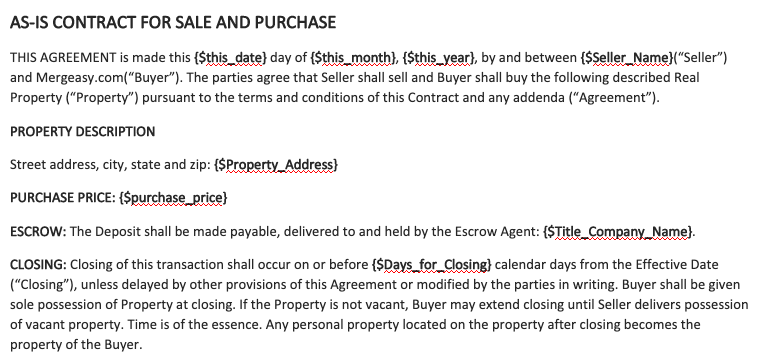
curl -H "Authorization: Bearer dGVzdEB0ZXN0LnRlc3Q6dGVzdHRlc3Q=" https://mergeasy.com/merge_file \
  -d '$this_date=23' \
  -d '$this_month=January' \
  -d '$this_year=2019' \
  -d '$Seller_Name=John Smith' \
  -d '$Property_Address=24, Brooklyn Ave.' \
  -d '$purchase_price=$80,000' \
  -d '$Title_Company_Name=Diamond Equity' \
  -d '$Days_for_Closing=15' \
  -d '$Days_of_Inspection=24' \
  -d '$Other_Terms=Additional Clauses' \
  -d doc_id=1234567 \
  -d doc_name=Contract_Test.docx \
  -d delivery_method=email \
  -d 'recipient_email=abc@example.com,hello@example.com' \
  -d 'email_subject=Please find attached Contract' \
  -d 'email_body=Hi, Please find attached!'
Podio Delivery
On your Documents page, click the PODIO REQUEST button for a specific document to receive the ready-made curl request in a popup.
| Parameter | Type | Description | |
|---|---|---|---|
delivery_method | string | required | Defines the delivery method as podio. |
doc_id | integer | required | Unique template id (from the PODIO REQUEST button). |
doc_name | string | required | Document name. Append .docx or .pdf. |
podio_item_id | integer | required | Podio item id. |
update_podio_field | JSON object | optional | {"field_external_id":"value"} — field to update after the merged document is attached. Find any app field's external id on the Podio app developer page. |
curl -H "Authorization: Bearer dGVzdEB0ZXN0LnRlc3Q6dGVzdHRlc3Q=" https://mergeasy.com/merge_file \
  -d '$this_date=23' \
  -d '$this_month=January' \
  -d '$this_year=2019' \
  -d '$Seller_Name=John Smith' \
  -d '$Property_Address=24, Brooklyn Ave.' \
  -d '$purchase_price=$80,000' \
  -d '$Title_Company_Name=Diamond Equity' \
  -d '$Days_for_Closing=15' \
  -d '$Days_of_Inspection=24' \
  -d '$Other_Terms=Additional Clauses' \
  -d doc_id=1234567 \
  -d doc_name=Contract_Test.docx \
  -d delivery_method=podio \
  -d podio_item_id=1234543 \
  -d 'update_podio_field={"field_external_id":"value"}'
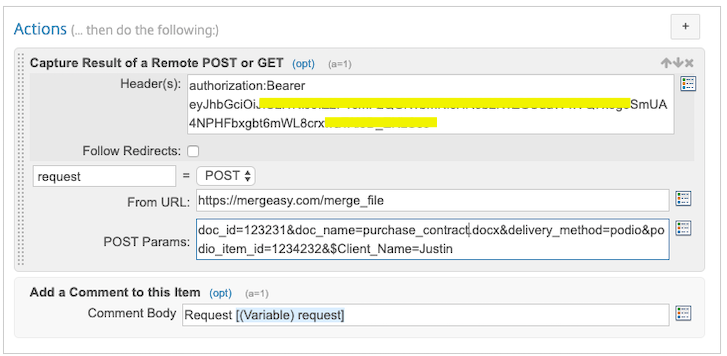
Example GlobiFlow request to attach a document to a Podio item.

Merged document attachment sample in a Podio item.
DocuSign Delivery
Visit the Integrations page under your account to sync your DocuSign account for digital signatures. On your Documents page, click the DOCUSIGN REQUEST button for a specific document to receive the ready-made curl request in a popup.
| Parameter | Type | Description | |
|---|---|---|---|
delivery_method | string | required | Defines the delivery method as docusign. |
doc_id | integer | required | Unique template id (from the DOCUSIGN REQUEST button). |
doc_name | string | required | Name of your uploaded document. Append .docx or .pdf. |
docusign_doc_name | string | required | Document name to give the DocuSign document. Append .docx or .pdf. |
email_subject | string | required | Email subject for the DocuSign delivery email. |
email_body | string | required | Email body for the DocuSign delivery email. |
sign_order | string | optional | Signing order. false = sequential, true = concurrent. |
recipient1_email | string | required | Email of the first recipient (maps to first actor's anchor tags). |
recipient1_phone | string | optional | Phone of the first recipient (Email + SMS feature). |
recipient1_name | string | required | Name of the first recipient. |
recipient2_email | string | required | Email of the second recipient (maps to second actor's anchor tags). |
recipient2_phone | string | optional | Phone of the second recipient (Email + SMS feature). |
recipient2_name | string | required | Name of the second recipient. |
curl -H "Authorization: Bearer dGVzdEB0ZXN0LnRlc3Q6dGVzdHRlc3Q=" https://mergeasy.com/merge_file \
  -d '$this_date=23' \
  -d '$this_month=January' \
  -d '$this_year=2019' \
  -d '$Seller_Name=John Smith' \
  -d '$Property_Address=24, Brooklyn Ave.' \
  -d '$purchase_price=$80,000' \
  -d '$Title_Company_Name=Diamond Equity' \
  -d '$Days_for_Closing=15' \
  -d '$Days_of_Inspection=24' \
  -d '$Other_Terms=Additional Clauses' \
  -d doc_id=1234567 \
  -d delivery_method=docusign \
  -d 'doc_name=Purchase Contract.docx' \
  -d 'docusign_doc_name=Purchase Contract.docx' \
  -d 'email_subject=Purchase Contract For Property XYZ' \
  -d 'email_body=Please sign the purchase contract for XYZ' \
  -d sign_order=false \
  -d recipient1_email=abc@example.com \
  -d recipient1_phone=+18888899999 \
  -d 'recipient1_name=John Smith' \
  -d recipient2_email=hello@example.com \
  -d recipient2_phone=+18888800000 \
  -d 'recipient2_name=James Goslin'

Example GlobiFlow request to send a document via DocuSign.
MergeSign Delivery
Below is an example POST request to send a merged document for signature via MergeSign.
| Parameter | Type | Description | |
|---|---|---|---|
delivery_method | string | required | Defines the delivery method as MergeSign. |
doc_id | integer | required | Unique template id (from the request button on your document page). |
doc_name | string | required | Name of your uploaded document. Append .docx or .pdf. |
eSign | string | required | Service type. true = e-signature, false = digital signature. |
email_subject | string | required | Email subject for the delivery email. |
email_body | string | required | Email body for the delivery email. |
sign_order | string | optional | Signing order. false = sequential, true = concurrent. |
recipient1_email | string | required | Email of the first recipient. |
recipient1_name | string | required | Name of the first recipient. |
recipient2_email | string | required | Email of the second recipient. |
recipient2_name | string | required | Name of the second recipient. |
curl -H "Authorization: Bearer dGVzdEB0ZXN0LnRlc3Q6dGVzdHRlc3Q=" https://mergeasy.com/merge_file \
  -d '$this_date=23' \
  -d '$this_month=January' \
  -d '$this_year=2019' \
  -d '$Seller_Name=John Smith' \
  -d '$Property_Address=24, Brooklyn Ave.' \
  -d '$purchase_price=$80,000' \
  -d '$Title_Company_Name=Diamond Equity' \
  -d '$Days_for_Closing=15' \
  -d '$Days_of_Inspection=24' \
  -d '$Other_Terms=Additional Clauses' \
  -d doc_id=1234567 \
  -d delivery_method=MergeSign \
  -d eSign=true \
  -d 'doc_name=Purchase Contract.docx' \
  -d 'email_subject=Purchase Contract For Property XYZ' \
  -d 'email_body=Please sign the purchase contract for XYZ' \
  -d sign_order=false \
  -d recipient1_email=abc@example.com \
  -d 'recipient1_name=John Smith' \
  -d recipient2_email=hello@example.com \
  -d 'recipient2_name=James Goslin'
DocuSign Anchor Tags
You may use anchor tags to plant signatures and fields on your uploaded template document for DocuSign delivery. Here is the list of available anchor tags:
| Anchor Tags | Description |
|---|---|
/sn1/ | Signature Field |
/dt1/ | Date Field |
/in1/ | Initial Field |
/tx1_1/ /tx1_2/ /tx1_3//tx1_1_req/ /tx1_2_req/ /tx1_3_req/ | Text Field (the _req variants are required fields) |
/cb1_1/ /cb1_2/ /cb1_3/ | Checkbox Field |
/sn1/ and /tx1_1/ for the first recipient. Change the font color to white to hide the tags from the merged document.
Merge API
Generate a mail-merge document and deliver it via the chosen delivery_method. This is the core endpoint used by all delivery methods above.
Request — application/x-www-form-urlencoded
Authorization: Bearer dGVzdEB0ZXN0LnRlc3Q6dGVzdHRlc3Q=
{
  "$this_date": "24",
  "$this_month": "December",
  "$this_year": "2018",
  "$Seller_Name": "John Kennedy",
  "$Property_Address": "42, Brooklyn Ave, TX",
  "$purchase_price": "$80,000",
  "$Title_Company_Name": "Diamond Equity",
  "$Days_for_Closing": "14 days",
  "$Days_of_Inspection": "30",
  "$Other_Terms": "Addendum",
  "doc_id": "272772",
  "doc_name": "Contract_Test.docx",
  "delivery_method": "podio",
  "podio_item_id": "282772761"
}
A 200 response indicates the merge job was accepted and delivered via the selected method.
DocuSign — Void an Envelope
Void a Sent or Delivered envelope.
| Parameter | Type | In | Description |
|---|---|---|---|
id | string | path | ID of the envelope. |
voidedReason | string | body | The reason for voiding the envelope. |
Authorization: Bearer dGVzdEB0ZXN0LnRlc3Q6dGVzdHRlc3Q=
{
  "envelopeId": "XXXXXXXXX-d552-47aa-bb64-XXXXXXXXX"
}
DocuSign — Get Envelope Status
Retrieve the current status and metadata of a DocuSign envelope.
| Parameter | Type | In | Description |
|---|---|---|---|
id | string | path | ID of the envelope. |
Authorization: Bearer dGVzdEB0ZXN0LnRlc3Q6dGVzdHRlc3Q=
{
  "status": "sent",
  "documentsUri": "/envelopes/dda19e19-.../documents",
  "recipientsUri": "/envelopes/dda19e19-.../recipients",
  "attachmentsUri": "/envelopes/dda19e19-.../attachments",
  "envelopeUri": "/envelopes/dda19e19-...",
  "emailSubject": "Test Contract",
  "emailBlurb": "Test",
  "envelopeId": "dda19e19-cf2f-4d74-900b-xxxxxxxxx",
  "signingLocation": "online",
  "customFieldsUri": "/envelopes/dda19e19-.../custom_fields",
  "notificationUri": "/envelopes/dda19e19-.../notification",
  "enableWetSign": "true",
  "allowMarkup": "false",
  "allowReassign": "true",
  "createdDateTime": "2021-01-08T07:52:41.5170000Z",
  "lastModifiedDateTime": "2021-01-08T07:52:41.5330000Z",
  "initialSentDateTime": "2021-01-08T07:52:42.3930000Z",
  "sentDateTime": "2021-01-08T07:52:42.3930000Z",
  "statusChangedDateTime": "2021-01-08T07:52:42.3930000Z",
  "documentsCombinedUri": "/envelopes/dda19e19-.../documents/combined",
  "certificateUri": "/envelopes/dda19e19-.../documents/certificate",
  "templatesUri": "/envelopes/dda19e19-.../templates",
  "expireEnabled": "true",
  "expireDateTime": "2021-05-08T07:52:42.3930000Z",
  "expireAfter": "109",
  "sender": {
    "userName": "Developer CTC",
    "userId": "ae7xxxxxxxx",
    "accountId": "03xxxxxxxxxxx",
    "email": "developer@con.in"
  }
}
Document Answer API (AI)
This API lets you harness AI to obtain valuable insights from uploaded documents. By submitting the document id and a specific query, you can integrate advanced document analysis into your workflows.
| Parameter | Type | Description | |
|---|---|---|---|
doc_id | string | required | Unique template id (from the API Action button on your document page). |
question | string | required | Your specific query or question about the content of the uploaded document. |
Authorization: Bearer dGVzdEB0ZXN0LnRlc3Q6dGVzdHRlc3Q=
{
  "doc_id": "169XXXXXXXX",
  "question": "Tell me the summary of the document."
}
{
  "statusCode": 200,
  "body": "..DOCUMENT SUMMARY.."
}
Merge Charts API
Generate chart images you can embed in your merged documents. Every chart is created with a single endpoint — the chartType path parameter selects the chart, and a chartAttr object in the body provides the data and styling.
{
  "status": "success",
  "public_url": "https://merge-charts.s3.ap-south-1.amazonaws.com/1610949881675_2020.png"
}
All chart requests send the header Authorization: Bearer <token> and use application/x-www-form-urlencoded. The examples below show the chartAttr payload for each chart type.
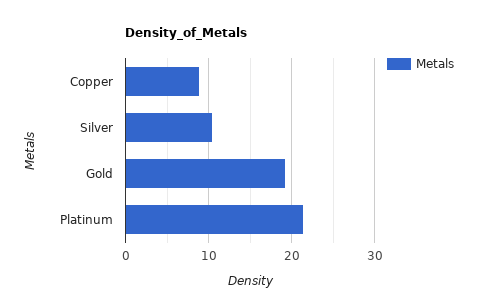
Bar Chart
chartData— array of[horizontal data, vertical data]pairs.chart_title— title of the chart.h_axis_title/v_axis_title— axis titles.chart_width— width of the chart in percent.column_vertical/column_horizontal— column names.img_width/img_height— image size in pixels.
{
  "chartAttr": {
    "chartData": [
      ["Pizza", 4900],
      ["Ice-Cream", 6788],
      ["Burger", 2377],
      ["Paties", 1008],
      ["Cold Coffee", 789]
    ],
    "chart_title": "2020",
    "h_axis_title": "Number of Items Sold",
    "v_axis_title": "Items",
    "chart_width": 50,
    "column_vertical": "Items",
    "column_horizontal": "Items sold",
    "img_width": 500,
    "img_height": 300
  }
}
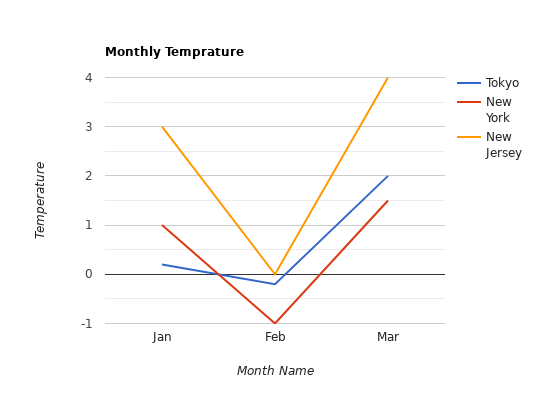
Line Chart
column_data— array of[data type, column name]definitions.chartData— array of row arrays for each column.chart_title,hAxis_title,vAxis_title— titles.pointVisible— show data points (boolean).img_width/img_height— image size in pixels.
{
  "chartAttr": {
    "column_data": [["string", "Month"], ["number", "Tokyo"], ["number", "New York"]],
    "chartData": "[['Jan',0.2,1],['Feb',-0.2,-1]]",
    "pointVisible": true,
    "chart_title": "Monthly Temprature",
    "hAxis_title": "Month Name",
    "vAxis_title": "Temperature",
    "img_width": 500,
    "img_height": 300
  }
}
Pie Chart
chartData— array of[entity name, value]pairs.chart_title— title of the chart.column_vertical/column_horizontal— column names.img_width/img_height— image size in pixels.

{
  "chartAttr": {
    "chartData": [
      ["Pizza", 4900],
      ["Ice-Cream", 6788],
      ["Burger", 2377],
      ["Paties", 1008],
      ["Cold Coffee", 789]
    ],
    "chart_title": "2020",
    "column_vertical": "Items",
    "column_horizontal": "Items sold",
    "img_width": 500,
    "img_height": 300
  }
}
Bubble Chart
column_data— array of[data type, column name]definitions.chartData— array of row arrays for each column.chart_title— title of the chart.img_width/img_height— image size in pixels.
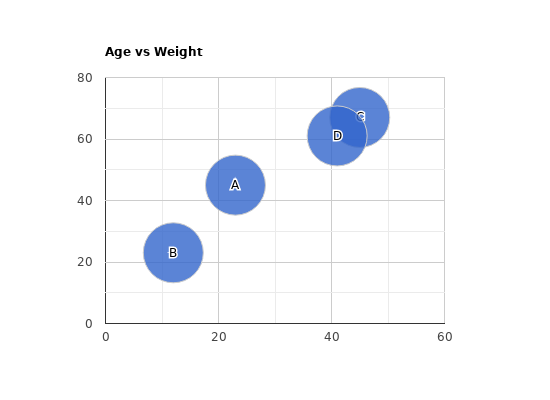
{
  "chartAttr": {
    "column_data": [["string", "id"], ["number", "age"], ["number", "weigth"]],
    "chartData": "[['A',23,45],['B',12,23],['C',45,67]]",
    "chart_title": "Age vs Weight",
    "img_width": 500,
    "img_height": 300
  }
}
Scatter Chart
column_data— array of[data type, column name]definitions.chartData— array of row arrays for each column.chart_title— title of the chart.img_width/img_height— image size in pixels.
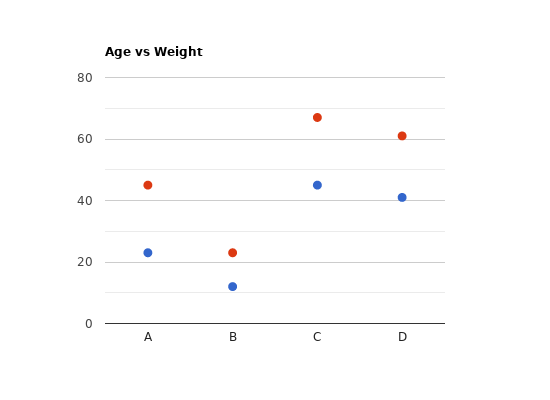
{
  "chartAttr": {
    "column_data": [["string", "id"], ["number", "age"], ["number", "weigth"]],
    "chartData": "[['A',23,45],['B',12,23],['C',45,67]]",
    "chart_title": "Age vs Weight",
    "img_width": 500,
    "img_height": 300
  }
}
Table Chart
column_data— array of[data type, column name]definitions.chartData— array of row arrays for each column.chart_title— title of the chart.img_width/img_height— image size in pixels.

{
  "chartAttr": {
    "column_data": [["string", "Name"], ["number", "Salary"], ["number", "attendance"], ["boolean", "Full time employee"]],
    "chartData": "[['Will',25000,340,true],['Nathan',20000,331,true],['Tim',{v:1200,f:'rs 1200'},322,false]]",
    "chart_title": "Office table"
  }
}
Histogram Chart
chartData— array of rows; the first row holds the column names.chart_title— title of the chart.color— color of the bars.img_width/img_height— image size in pixels.
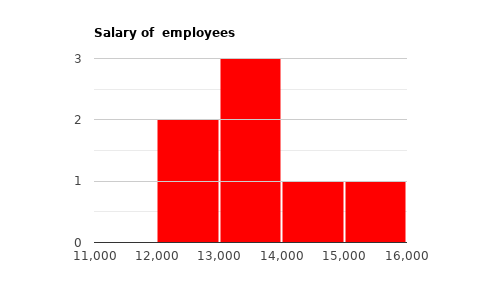
{
  "chartAttr": {
    "chartData": "[['Employee Name','Salary'],['John','12000'],['Jerry',13000],['Sam',14000],['Sunn',15000],['Tim',13500]]",
    "chart_title": "Salary of Employees",
    "color": "red",
    "img_width": 400,
    "img_height": 300
  }
}
Combination Chart
column_data— array of[data type, column name]definitions.chartData— array of row arrays for each column.chart_title,hAxis_title,vAxis_title— titles.default_series— default chart type (e.g.bars).combo_series— extra chart type in the combination (e.g.area).img_width/img_height— image size in pixels.

{
  "chartAttr": {
    "column_data": [["string", "subjects"], ["number", "John"], ["number", "Harry"], ["number", "Average"]],
    "chartData": "[['Physics',30,40,35],['Chemistry',20,30,25],['Mathematics',40,40,40]]",
    "chart_title": "Marks achieved",
    "vAxis_title": "Marks",
    "hAxis_title": "Subjects",
    "default_series": "bars",
    "combo_series": "area",
    "img_width": 400,
    "img_height": 300
  }
}
Calendar Chart
chartData— array of[date, value]pairs.chart_title— title of the chart.vAxis_title— vertical axis title.img_width/img_height— image size in pixels.
{
  "chartAttr": {
    "chartData": "[[new Date(2020, 9, 12),12],[new Date(2020, 9, 13),8],[new Date(2020, 9, 14),11],[new Date(2020, 9, 15),10],[new Date(2020, 9, 16),4]]",
    "chart_title": "C2C attendance",
    "img_width": 400,
    "img_height": 300
  }
}
Gantt Chart
chartData— rows of[Task ID, Task Name, Start date, End date, Duration, Percent Complete, Dependencies].chart_title— title of the chart.img_width/img_height— image size in pixels.
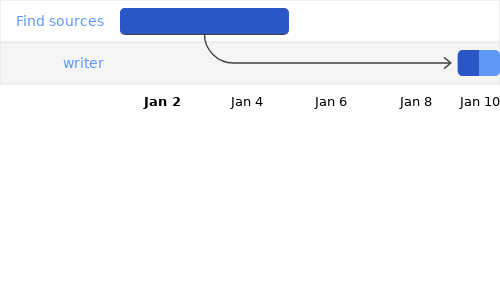
{
  "chartAttr": {
    "chartData": "[['Research', 'Find sources', new Date(2020, 0, 1), new Date(2020, 0, 5), null, 100, null],['write', 'writer', new Date(2020, 0, 9), new Date(2020, 0, 10), daysToMilliseconds(1), 50, 'Research']]",
    "chart_title": "Gantt",
    "img_width": 400,
    "img_height": 300
  }
}
TrendLine Chart
column_data— array of[data type, column name]definitions.chartData— array of row arrays for each column.chart_title,hAxis_title,vAxis_title— titles.column_1/column_2/column_3— column names.column_1_type— column 1 data type.trendlines_type— trendline definition, e.g.{0:{type:'linear',lineWidth:3,opacity:0.3}}(types:linear,polynomial,exponential).img_width/img_height— image size in pixels.
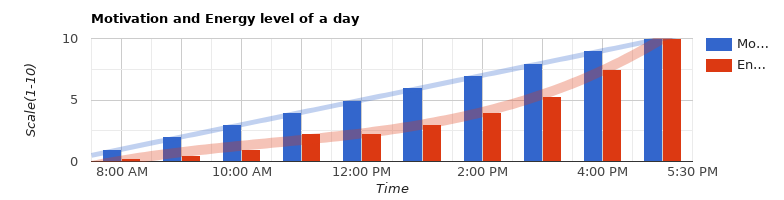
{
  "chartAttr": {
    "column_data": [["timeofday", "Time of Day"], ["number", "Motivation level"], ["number", "Energy"]],
    "chartData": "[[{ v: [8, 0, 0], f: '8 am' }, 1, 0.25],[{ v: [9, 0, 0], f: '9 am' }, 2, 0.5],[{ v: [10, 0, 0], f: '10 am' }, 3, 1],[{ v: [11, 0, 0], f: '11 am' }, 4, 2.25],[{ v: [12, 0, 0], f: '12 pm' }, 5, 2.25]]",
    "column_1_type": "timeofday",
    "column_1": "Time of Day",
    "column_2": "Motivation level",
    "column_3": "Energy Level",
    "chart_title": "Motivation and Energy level of a day",
    "hAxis_title": "Time",
    "vAxis_title": "Scale(1-10)",
    "trendlines_type": "{0:{type:'linear',lineWidth:5,opacity:0.3},1:{type:'polynomial',lineWidth:10,opacity:0.3},2:{type:'exponential',lineWidth:5,opacity:0.3}}",
    "img_width": 400,
    "img_height": 300
  }
}
Timeline Chart
column_data— array of[data type, column name]definitions.chartData— array of row arrays for each column.chart_title— title of the chart.color— array of color codes for each column.img_width/img_height— image size in pixels.
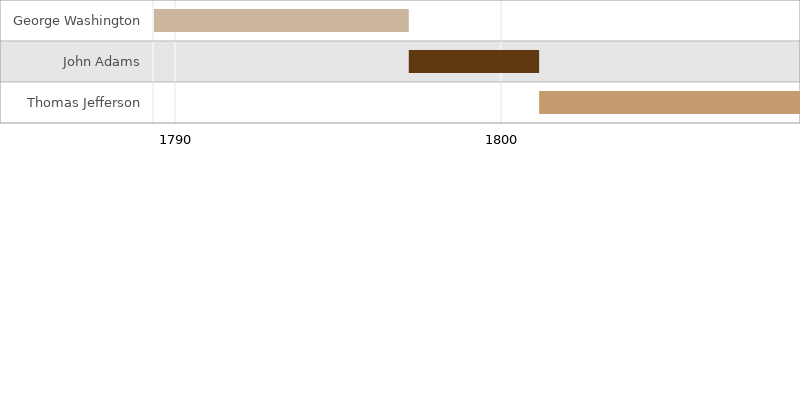
{
  "chartAttr": {
    "column_data": [["string", "President"], ["date", "start"], ["date", "end"]],
    "chartData": "[['George Washington', new Date(1789, 3, 30), new Date(1797, 2, 4)],['John Adams', new Date(1797, 2, 4), new Date(1801, 2, 4)],['Thomas Jefferson', new Date(1801, 2, 4), new Date(1809, 2, 4)]]",
    "chart_title": "US Presidents Working Period",
    "color": ["#cbb69d", "#603913", "#c69c6e"],
    "img_width": 800,
    "img_height": 400
  }
}
Stepped Area Chart
chartData— array of rows; the first row holds the column names.chart_title— title of the chart.vAxis_title— vertical axis title.img_width/img_height— image size in pixels.
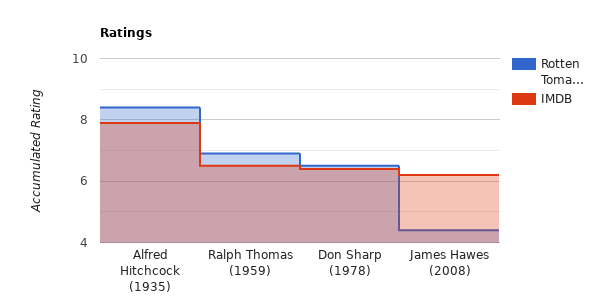
{
  "chartAttr": {
    "chartData": "[['Director (Year)','Rotten Tomatoes','IMDB'],['Alfred Hitchcock (1935)',8.4,7.9],['Ralph Thomas (1959)',6.9,6.5],['Don Sharp (1978)',6.5,6.4],['James Hawes(2008)',4.4,6.2]]",
    "chart_title": "Ratings",
    "vAxis_title": "Accumulated Rating",
    "img_width": 600,
    "img_height": 300
  }
}
Gauge Chart
chartData— array of rows; the first row holds the column names.gauge_width/gauge_height— gauge size.minor_ticks— number of ticks between two values.img_width/img_height— image size in pixels.
{
  "chartAttr": {
    "chartData": "[['Label', 'Value'],['Memory', 80],['CPU', 55],['Net',68],['Net',68]]",
    "gauge_width": 100,
    "gauge_height": 120,
    "minor_ticks": 5,
    "img_width": 300,
    "img_height": 200
  }
}
Area Chart
chartData— array of rows; the first row holds the column names.chart_title— title of the chart.hAxis_title— horizontal axis title.img_width/img_height— image size in pixels.

{
  "chartAttr": {
    "chartData": "[['Year', 'Sales', 'Expenses'],[2013,1000,400],[2014,1170,460],[2015,660,1120],[2016,1030,540]]",
    "chart_title": "Company Perfomance",
    "hAxis_title": "Year",
    "img_width": 500,
    "img_height": 300
  }
}